

Printmaking Supplies: A Buying Guide for Australian Artists
What if the secret to a crisp, professional print isn't the pressure of your press, but the specific synergy between your ink and paper? Many artists spend years struggling with ink that dries too quickly on the slab or …What if the secret to a crisp, professional print isn't the pressure of your press, but the specific synergy between your ink and paper? Many artists spend years struggling with ink that dries too quickly on the slab or paper that feathers and bleeds, leading to wasted materials and unnecessary frustration. It's a common hurdle in printmaking, especially when you're trying to distinguish between the cleanup requirements of water-based and oil-based mediums.
This guide helps you navigate the essential inks, papers, and tools needed to produce professional-quality prints in your home or studio. We'll break down how to choose a reliable set of supplies that work with your specific technique, whether you're carving lino or experimenting with woodblocks. You'll learn how to select the right paper gsm, or grams per square metre, for your needs and how to set up a workspace that makes the process both efficient and enjoyable. From understanding ink tack to choosing the right carving tools, we've gathered the practical knowledge you need to create with confidence.
Key Takeaways
- Learn the differences between relief printing methods like lino cuts and woodblocks to choose the right matrix for your creative project.
- Master the balance of ink tack and viscosity to ensure your printmaking results are crisp and professional every time.
- Understand how paper absorbency and weight, measured in gsm, affect the final outcome of your relief or intaglio prints.
- Discover why investing in high-quality carving chisels that can be sharpened provides better value for money and finer detail in your work.
- Get practical advice on assembling a functional starter kit for relief printing at home without overspending on unnecessary equipment.
Navigating Printmaking Techniques and Equipment Needs
Printmaking is the process of transferring an image from a matrix, such as a carved block or an etched plate, onto a surface like paper or fabric. This technique allows artists to create multiple impressions of the same design, forming what's known as an edition. Unlike direct painting, the final result is often a mirror image of the original matrix, which requires a bit of forward planning during the design phase. It's a medium that rewards patience and precise tool handling, whether you're working on a kitchen table or in a dedicated studio.
Relief Printing for the Home Studio
Relief printing is arguably the most accessible starting point for those without a heavy press. Methods like lino cuts and woodblocks involve carving away the areas of the block that you want to remain white, leaving a raised surface to hold the ink. Because the ink sits on the top of the block, you can achieve professional results by hand-burnishing. Using a baren or even a sturdy wooden spoon allows you to apply targeted pressure to the back of the paper, pulling the ink from the block with surprising clarity. This tactile approach makes lino printing a favourite for artists who enjoy a hands-on, low-tech process.
Intaglio and Planographic Methods
Intaglio methods, such as etching and drypoint, operate on the opposite principle to relief. In these techniques, the ink sits in recessed lines or textures carved into a plate, rather than on the surface. To successfully transfer the image, you need significant pressure to force the paper into the grooves to pick up the ink. While traditional etching often involves chemical baths, drypoint allows you to scratch directly into a plate with a sharp needle, creating a burr that holds the ink for a soft, velvety line quality.
If you're interested in a more painterly approach, monotype and monoprinting allow for unique, single-edition works. These involve painting directly onto a smooth plate before transferring the image to paper. You can achieve vibrant results using Matisse acrylics when paired with slow-drying mediums. These mediums extend the time the paint stays wet, ensuring it doesn't dry on the plate before you've had a chance to complete the transfer. For those looking to build their skills, attending creative workshops can provide the practical experience needed to master these diverse techniques.
Essential Printmaking Inks and Application Tools
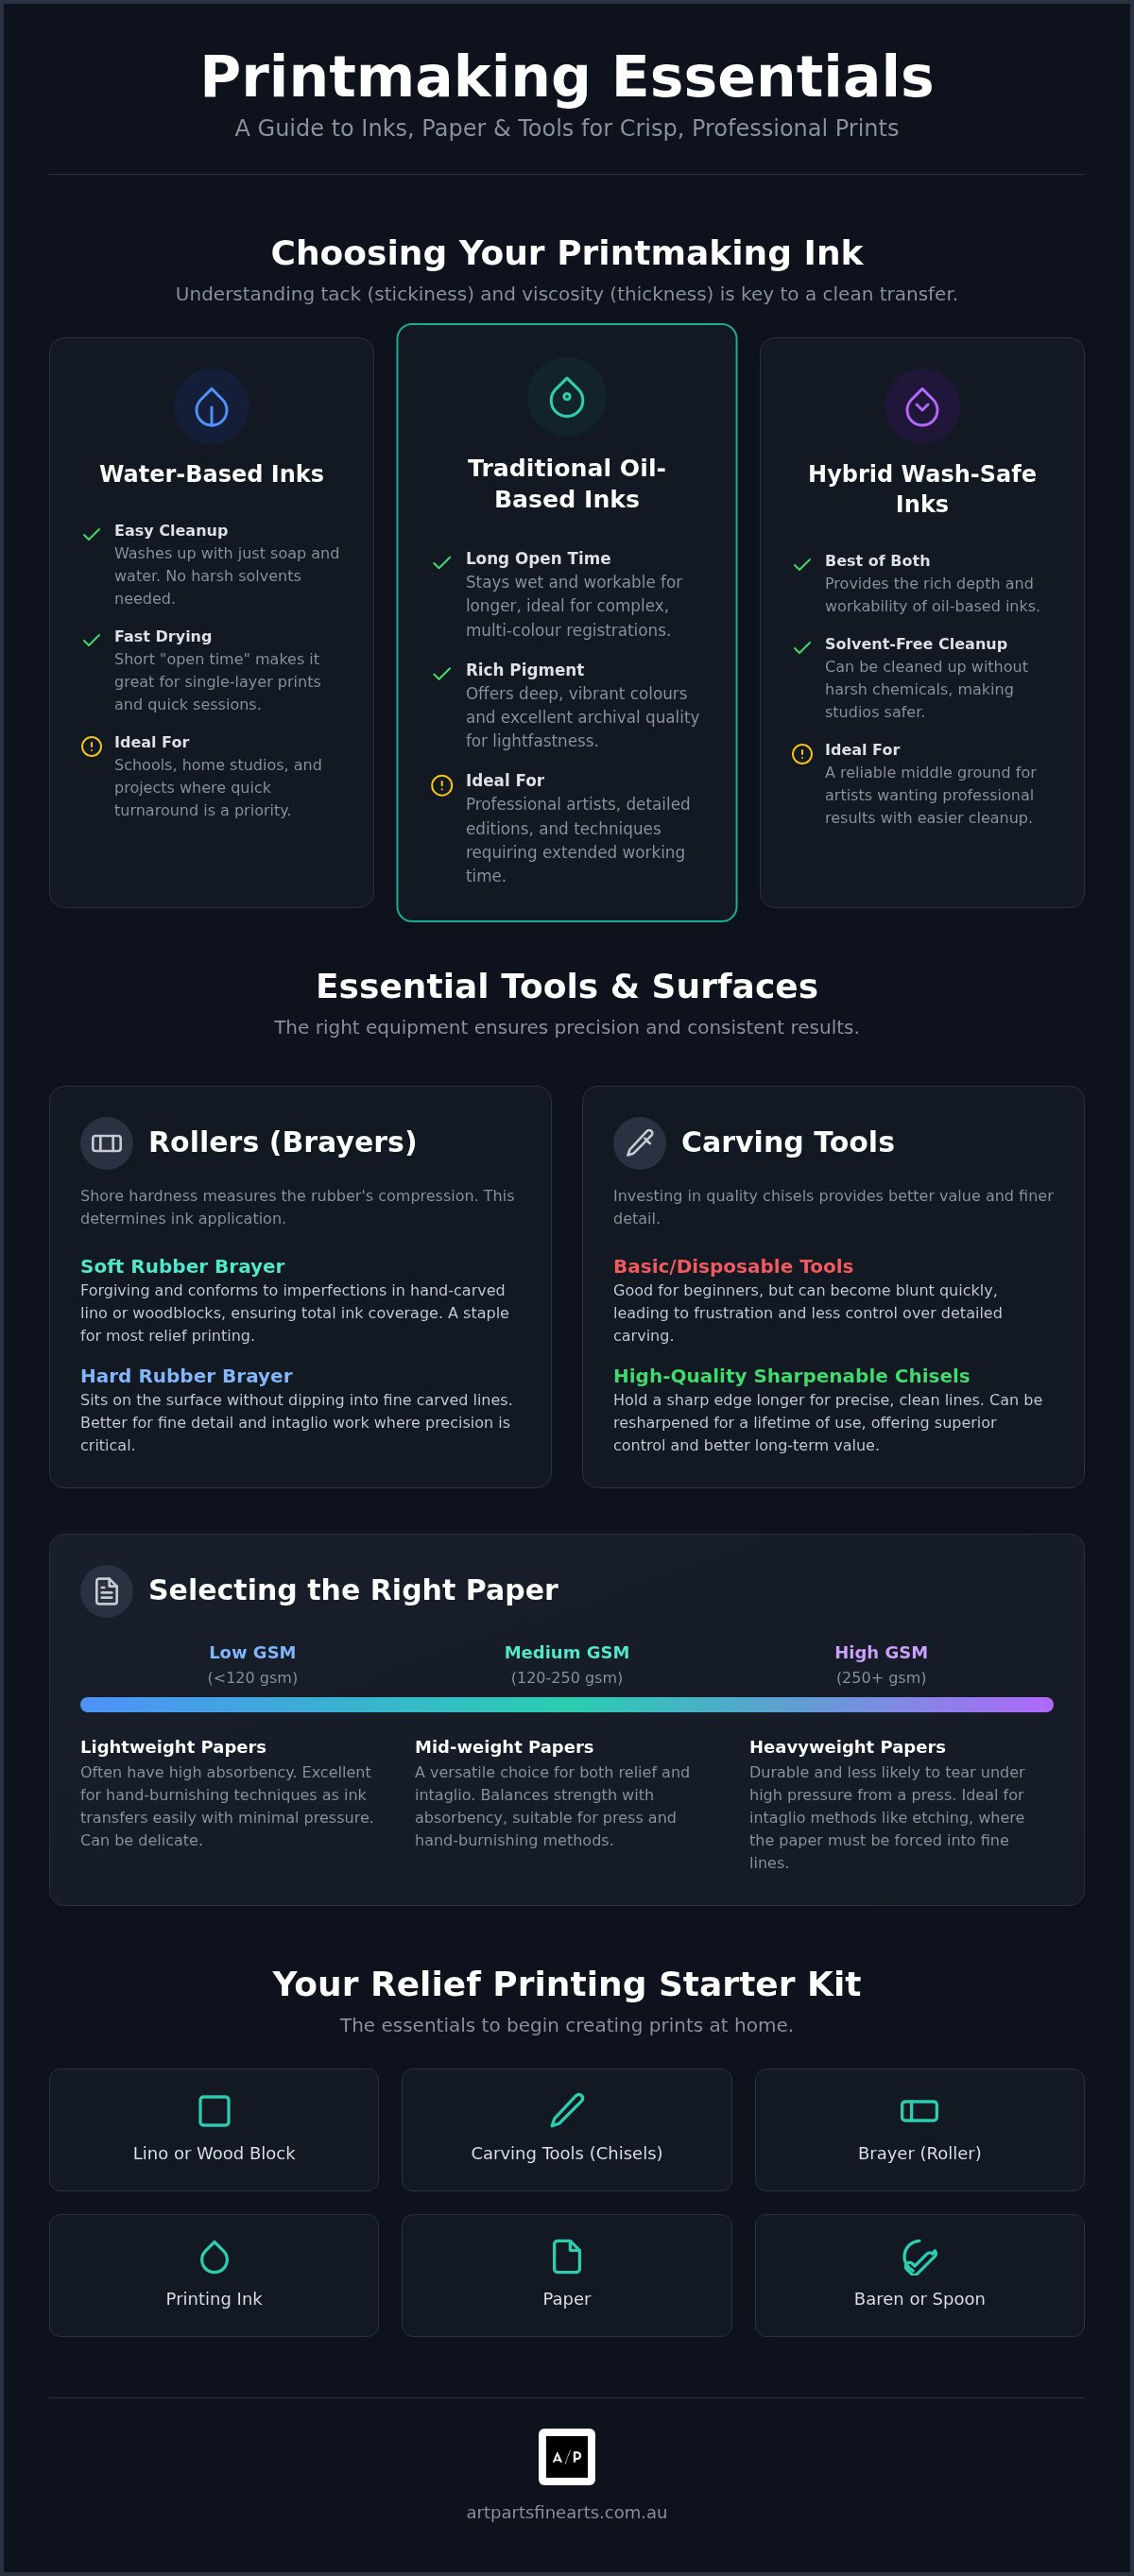
Achieving a crisp, professional print starts with understanding how ink behaves on your block and paper. Two key factors are tack, which is the stickiness of the ink, and viscosity, which refers to its thickness or resistance to flow. If your ink is too thin, it will likely fill in fine carved lines and blur your image. If it's too sticky, it may tear the surface of your paper or create a mottled texture known as orange peel. High-quality pigments are essential for archival longevity, ensuring your work remains lightfast and vibrant for decades without fading under UV light.
Water-Based vs Oil-Based Inks
Selecting the right ink often depends on your workspace and project timeline. Water-based inks dry quickly and allow for easy cleanup with simple soap and water, making them a practical choice for schools or shared home studios where solvent use is restricted. These inks are excellent for single-layer prints or quick sessions, though they can be more challenging for complex registrations because they dry so fast on the slab.
Traditional oil-based inks offer a longer "open time," which is the period the ink stays wet and workable. This flexibility is helpful when you're managing multi-colour registrations that require careful alignment over several hours. For many Australian artists, hybrid wash-safe inks provide a reliable middle ground. These offer the rich depth and working properties of oil-based mediums but can be cleaned up without harsh chemicals, keeping your studio environment safer and more comfortable.
Rollers and Brayers
Your choice of brayer or roller is just as important as the ink itself for a consistent finish. These tools are often categorised by their shore hardness, a metric that measures how much the rubber compresses under pressure. A soft rubber brayer is forgiving; it conforms to the slight imperfections found in hand-carved lino or woodblocks to ensure total coverage. This makes it a staple for relief printmaking where the surface might not be perfectly level.
In contrast, a hard roller is better for fine detail work because it sits on the surface of the block without dipping into thin carved lines. The diameter of the roller also matters; a larger diameter allows for a longer continuous roll-out, which helps in applying an even coat of ink to larger blocks. To maintain your tools, always store rollers so the rubber doesn't touch the bench, as this prevents permanent flat spots from forming. If you are looking to stock up on professional materials for your studio, consider the value of bulk art supplies to keep your creative momentum going.
Selecting the Right Paper and Carving Surfaces
The success of a print often depends as much on the surface as it does on the ink. Paper absorbency dictates how the ink is pulled from the matrix; if a paper is too heavily sized, or treated with water-resistant agents, the ink may smudge. Conversely, unsized papers allow the ink to penetrate deep into the fibres for a rich, matte finish. For techniques like etching, you'll need a paper that can withstand dampening. Heavier weights, such as 300gsm (grams per square metre), are ideal because they remain structurally sound after soaking, allowing the fibres to soften and reach into the recessed lines of your plate.
Professional Printmaking Papers
Industry standards like Arches 88 and BFK Rives are favoured for their consistent ink absorption and archival quality. These are typically cotton rag papers, meaning they are made from 100% cotton fibres rather than wood pulp, which ensures they don't yellow or become brittle over time. If you're working with delicate hand-burnished relief prints, Hahnemühle bamboo or thin rice papers are excellent choices. Their smooth surfaces and lighter weights allow you to see the image through the back of the paper as you rub, helping you judge the ink transfer. You can explore our full range of specialised art paper to find the right match for your technique.
Carving Blocks and Plates
Your choice of carving surface significantly impacts the level of detail you can achieve. Traditional grey, hessian-backed lino is a classic for a reason; it's durable and holds a very fine line. It can be quite stiff, so many artists find it helpful to warm the block slightly on a heater or with a hairdryer to make the material more supple before carving. Modern soft-carve rubber blocks offer a different experience. They're much easier to cut, making them perfect for beginners or for creating high-speed designs with bold, expressive marks.
For artists who appreciate a natural aesthetic, plywood and timber blocks provide a visible wood grain texture that becomes part of the final printmaking artwork. This adds a layer of organic detail that synthetic materials can't replicate. Whether you're working on a single block or a complex multi-layered woodcut, choosing the right ground is the foundation of a successful edition.
Stock up on professional studio supplies for your next project
Building Your Printmaking Kit at Art Parts Fine Arts
Assembling a versatile kit for your home studio involves more than just buying a few blocks and some ink. It's about selecting a cohesive set of tools that allow you to work efficiently while protecting your workspace. A thoughtful setup includes a dedicated area for inking, a clean space for paper handling, and professional cleanup supplies to maintain your equipment. This organised approach helps you avoid common frustrations like getting ink on your clean paper or damaging your carving surface.
Investing in high-quality carving chisels is one of the most effective ways to improve your results. While beginner sets often feature interchangeable nibs, fixed-blade tools offer superior balance and can be sharpened repeatedly. This durability provides better value for money and ensures your tools remain sharp enough to glide through lino without slipping. Keeping your blades honed is a practical habit that every artist should practise to ensure both safety and precision during long carving sessions.
Recommended Supplies for Beginners
If you're just starting, we suggest a 10cm soft rubber brayer and a basic set of water-based inks for their manageable drying times. Pre-cut lino packs are ideal for learning how to control depth without the pressure of preparing large surfaces from scratch. For test proofing your designs, using A4 specialised paper pads helps you judge your progress before committing to premium archival sheets. These entry-level tools are designed to build your confidence as you learn the fundamentals of the craft.
Advanced Tools and Professional Upgrades
As you move towards multi-layered prints, registration becomes a critical skill to develop. Using registration jigs or simple masking tape hinges ensures that each colour layer aligns perfectly with the previous one, preventing blurred or ghosted images. To master these advanced techniques and gain confidence with professional equipment, you can join one of our creative workshops. For those working on a larger scale, transitioning to wide-format paper rolls or fixed-blade Japanese carving tools allows for superior precision and oversized relief projects. You can also find a variety of studio accessories to help organise your workspace and keep your tools in top condition.
Equipping Your Studio for Professional Results
Setting up a functional studio requires a balance of technical knowledge and the right materials. You now understand how ink tack affects your detail and why professional papers like Arches and Hahnemühle are the industry standard for archival results. By selecting tools that can be maintained over time, such as sharpenable chisels, you're investing in the long-term success of your work.
Our team at Art Parts Fine Arts consists of practising artists who understand the technical nuances of the craft. We carefully curate our selection to ensure every product meets high standards for durability and ease of use. Whether you're working in a home studio or a professional space, we provide national shipping across Australia from our Albury centre to help you get the supplies you need.
We're here to support your creative growth and help you find the right tools for your next edition. Reach out if you need a hand choosing the best paper gsm or ink type for your specific technique.
Frequently Asked Questions
Do I need a printing press to start printmaking at home?
You don't need a printing press to begin your journey into relief printmaking. Techniques like lino cutting and woodblock printing are perfectly suited for hand-burnishing with a baren or a sturdy wooden spoon. While a press provides even pressure for large editions or intaglio work, many artists prefer the tactile control of hand-printing. This approach allows you to set up a functional studio on any flat tabletop without a major equipment investment.
What is the difference between water-based and oil-based printmaking ink?
The primary differences lie in the drying time and the cleanup process. Water-based inks dry rapidly on the slab and clean up easily with soap and water, making them ideal for shared spaces or quick sessions. Oil-based inks offer a longer open time for complex registrations but traditionally require solvents for cleanup. Many modern artists now choose hybrid wash-safe inks that provide the rich depth of oil with the convenience of water-based washing.
Which paper is best for lino printing without a press?
When printing by hand, choose a smooth, lightweight paper that allows for easy ink transfer without heavy pressure. Hahnemühle bamboo and various rice papers are excellent choices because they are thin enough to let you see the image through the back of the sheet as you burnish. This transparency helps you identify areas that need more rubbing. Heavier 300gsm papers are usually too thick for hand-printing and are better reserved for use with a press.
How do I clean my rollers and carving tools properly?
Proper maintenance extends the life of your equipment and ensures consistent results. For rollers, wipe away excess ink with a scrap of paper before using a mild detergent or specialised wash to remove the remaining residue. Always store your brayers so the rubber doesn't touch the bench to prevent flat spots. For carving tools, wipe the blades clean after use and store them in a dry place; regular sharpening with a whetstone will keep the edges precise.
What does gsm mean when choosing printmaking paper?
Gsm stands for grams per square metre and is the standard metric measurement for the weight and thickness of paper. A lower gsm, such as 90 to 120, indicates a thin sheet suitable for proofing or delicate relief work. Heavier papers, ranging from 250 to 300gsm, are thicker and more durable. These heavier weights are often necessary for intaglio processes where the paper must be dampened and pulled through a high-pressure press to absorb ink from the grooves.
Can I use acrylic paint for printmaking instead of specialised ink?
While you can use acrylic paint, it's generally too thin and dries too quickly for traditional relief methods. Specialised inks have a higher tack and viscosity, which prevents them from bleeding into your carved lines. If you want to use acrylics for monotypes, we suggest mixing Matisse acrylics with a slow-drying medium. This combination extends the working time and helps the paint behave more like a dedicated ink, allowing for a successful transfer from the plate to the paper.

Article by
Art Parts Fine Arts
Art Parts Fine Arts is an Australian art-supplies store based in Albury, shipping Australia-wide. Hand-picked by artists, our range covers paints, canvas, brushes, paper, printmaking and more, for everyone from students to professionals. We share practical guides and tips to help you get the most out of your materials.
Disclaimer
This article is general information to help you choose and use art materials. It is not professional, health or safety advice. Always follow the manufacturer's instructions and safety guidance for any product, and take care when using solvents, varnishes and other materials. Product availability, specifications and pricing may change, so please check the current product page for details.